
Setting up OAuth 2.0
in RapiDoc
A clear, step-by-step tutorial to configure OAuth 2.0 and OpenID Connect in your API documentation. Connect to any Identity Provider (Auth0, Okta, Azure AD, Keycloak, Duende), authenticate via secure popups, and execute live API calls with zero backend relay code.
index.html and oauth-receiver.html. No custom JavaScript or backend proxy needed.The 30-Second Summary
Setting up OAuth 2.0 in RapiDoc requires only 3 simple steps:
Register Client with Identity Provider
In your IdP console (Auth0, Okta, Azure AD, etc.), create a public client and register your redirect URI:https://your-domain.com/oauth-receiver.html
Create index.html
Add the <rapi-doc> element pointing to your OpenAPI spec. RapiDoc automatically manages the popup lifecycle.
Create oauth-receiver.html
Create a file named oauth-receiver.html containing <oauth-receiver> in the same folder.
Architecture & Authorization Code Flow
When a user initiates authentication, RapiDoc coordinates between the documentation window, a secure popup window, and your authorization server.
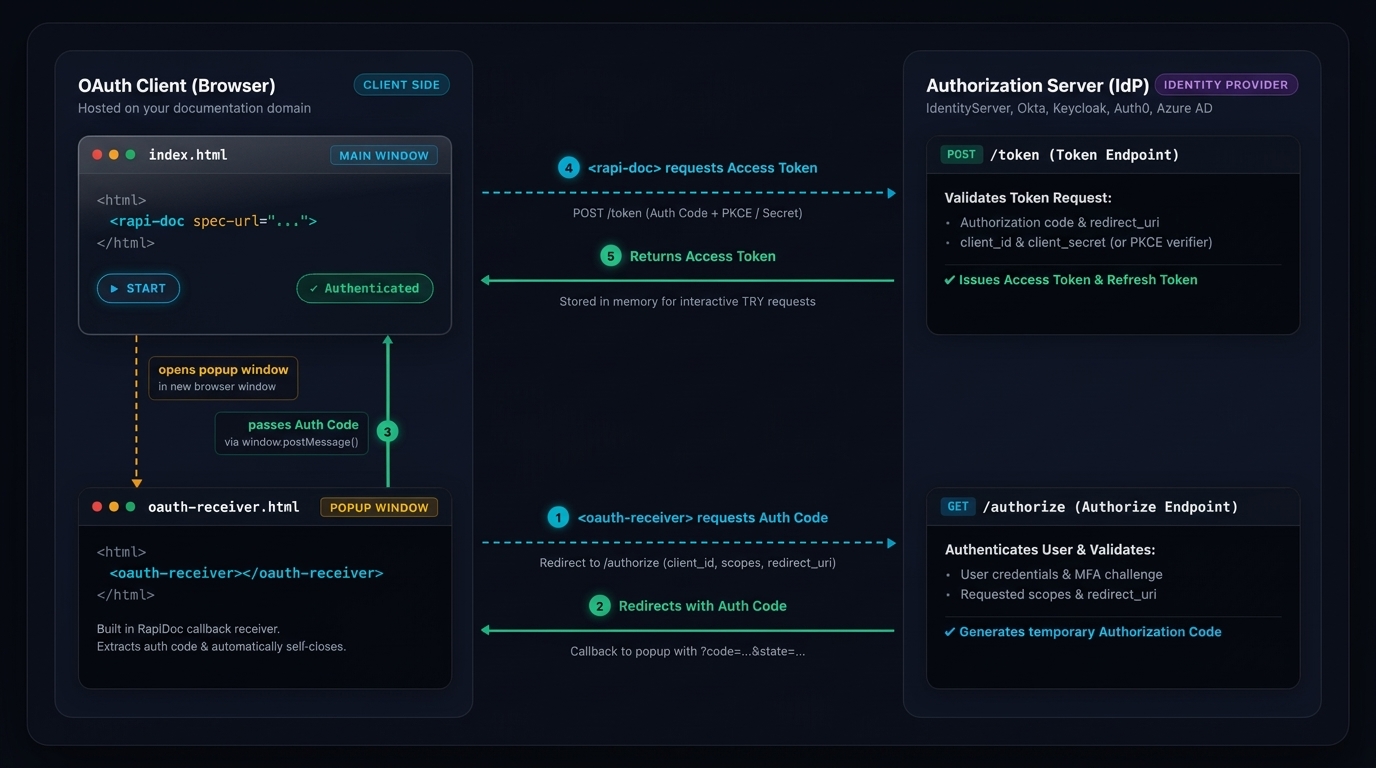
<oauth-receiver> popup relay and PKCE token exchange.User Clicks "Authorize"
The developer clicks "Authorize" on an endpoint or the top security modal. <rapi-doc> opens a lightweight browser popup pointing to oauth-receiver.html.
Redirect to Identity Provider
<oauth-receiver> immediately constructs the authorization URL with client_id, redirect_uri, requested scopes, state, and PKCE code challenge, then redirects the popup to your IdP.
User Consent & Login
The developer authenticates directly on the Identity Provider login page and grants consent to requested scopes.
Callback to Receiver Popup
Upon success, the IdP redirects the popup back to your registered redirect URI: oauth-receiver.html?code=AUTH_CODE&state=STATE.
Local Relay & Popup Closure
The <oauth-receiver> custom element extracts the code, securely transmits it to <rapi-doc> in the parent window via window.postMessage(), and automatically closes itself.
Token Exchange & Automatic Header Injection
<rapi-doc> calls your IdP tokenUrl to exchange the authorization code for an Access Token, stores it in memory, and attaches Authorization: Bearer <token> to all interactive TRY calls.
Complete Implementation Guide
Follow these detailed steps to set up OAuth 2.0 authentication from scratch.
Register Your Application with your Identity Provider
Before configuring RapiDoc, register your documentation portal as a client application in your Identity Provider (IdP). Examples include Auth0, Okta, Microsoft Entra ID (Azure AD), Keycloak, or Duende IdentityServer.
Key Registration Requirements:
- Application Type: Single Page Application (SPA) or Public Native Client.
- Allowed Grant Types:
Authorization CodewithPKCE. - Redirect URI: The exact URL where your receiver page is served. For example:
http://localhost:8080/oauth-receiver.html(for local testing)https://api.yourcompany.com/docs/oauth-receiver.html(for production) - Allowed Origins / CORS: Ensure your documentation origin is permitted on the token and authorize endpoints.
Auth URL:
https://demo.duendesoftware.com/connect/authorizeToken URL:
https://demo.identityserver.io/connect/tokenPublic Client ID:
interactive.public (PKCE enabled, no secret required)Confidential Client ID:
interactive.confidential.short (Secret: secret)Create your Main Documentation Page (index.html)
Create your primary documentation HTML file. Import RapiDoc from a CDN or local bundle and add the <rapi-doc> element pointing to your OpenAPI specification.
<!doctype html>
<html lang="en">
  <head>
    <meta charset="utf-8">
    <title>API Documentation</title>
    <!-- 1. Load RapiDoc Web Component from CDN -->
    <script type="module" src="https://unpkg.com/rapidoc/dist/rapidoc-min.js"></script>
  </head>
  <body>
    <!-- 2. Embed <rapi-doc> pointing to your OpenAPI spec -->
    <rapi-doc
      spec-url="https://mrin9.github.io/RapiDoc/specs/oauth.yaml"
      render-style="focused"
      allow-try="true"
    > </rapi-doc>
  </body>
</html>oauth-receiver.html in the current folder. If your receiver file is in a custom subfolder, supply the oauth-receiver attribute:<!-- If oauth-receiver.html is hosted in a different path or subdirectory: -->
<rapi-doc
spec-url="/specs/api.yaml"
oauth-receiver="/auth/oauth-receiver.html"
> </rapi-doc>Create the OAuth Receiver Callback Page (oauth-receiver.html)
Create a second HTML file named oauth-receiver.html in the same directory. This file contains RapiDoc's companion <oauth-receiver> element.
<!doctype html>
<html lang="en">
  <head>
    <meta charset="utf-8">
    <title>OAuth Receiver</title>
    <!-- Load the same RapiDoc script -->
    <script type="module" src="https://unpkg.com/rapidoc/dist/rapidoc-min.js"></script>
  </head>
  <body>
    <!-- The companion custom element that relays auth codes and closes the popup -->
    <oauth-receiver> </oauth-receiver>
  </body>
</html>
What does <oauth-receiver> do automatically?
- Zero Custom JavaScript: You do NOT need to write query string parsers, state verifiers, or window messaging code.
- Extracts Auth Code: Reads the authorization code (
?code=...) or implicit token (#access_token=...) from the URL. - Relays to Main Window: Sends the credentials to
<rapi-doc>in the parent window viawindow.postMessage()(with an automatic fallback tosessionStorage). - Auto-Closes Popup: Closes the popup window immediately after successful transmission.
Configure OAuth 2.0 in your OpenAPI Specification
In your OpenAPI 3.0 or 3.1 specification, declare your OAuth 2.0 security scheme under components.securitySchemes, and protect relevant endpoints by referencing it under security:
openapi: 3.0.3
info:
  title: Protected API Service
  version: "1.0.0"
servers:
  - url: https://demo.duendesoftware.com

paths:
  /api/test:
    get:
      summary: Test Authenticated Endpoint
      security:
        - demo-oauth:
            - openid
            - email
            - profile
      responses:
        '200':
          description: Successful operation

components:
  securitySchemes:
    demo-oauth:
      type: oauth2
      description: Enterprise OAuth 2.0 Authorization Code flow
      flows:
        authorizationCode:
          authorizationUrl: https://demo.duendesoftware.com/connect/authorize
          tokenUrl: https://demo.identityserver.io/connect/token
          scopes:
            openid: OpenID Connect identity
            email: User email address
profile: User profile informationSupercharge Developer UX with RapiDoc Vendor Extensions
To make authentication frictionless for developers testing your API, RapiDoc provides custom OpenAPI vendor extensions (x-*) to pre-populate credentials and enforce modern security protocols like PKCE:
| Extension | Type | Applicable Level | Purpose |
|---|---|---|---|
x-client-id | string | Scheme or Flow | Pre-populates the Client ID input in the authorization modal, saving developers from manually entering it. |
x-client-secret | string | Scheme or Flow | Pre-populates the Client Secret input. Intended strictly for test/sandbox credentials, never for production secrets. |
x-default-scopes | array | string | Scheme or Flow | Pre-selects specified scopes in the authorization dialog checkbox list (array of strings or space-separated list). |
x-pkce-only | boolean | Flow | When true, enforces PKCE (RFC 7636) and hides the Client Secret field completely from the authorization UI. |
x-receive-token-in | request-body | header | Scheme or Flow | Specifies whether client credentials should be passed in request body (client_secret_post) or Authorization header (client_secret_basic) when calling the tokenUrl. Default is request-body. |
x-receive-token-in-options | array | Scheme or Flow | Limits the client authentication options available in the UI dropdown (e.g. ["request-body", "header"]). |
x-authorize-params | object | string | Scheme or Flow | Custom query parameters appended to authorizationUrl (e.g. proxy launch parameters, audience, prompt). |
x-token-params | object | string | Scheme or Flow | Custom parameters included in the POST request body to tokenUrl (e.g. custom IdP proxy fields, audience, resource). |
Specification Example with Vendor Extensions:
components:
  securitySchemes:
    # Scheme 1: Public Client (PKCE Enforced - Recommended for Documentation)
    public-oauth:
      type: oauth2
      description: Public client authorization flow with PKCE
      flows:
        authorizationCode:
          authorizationUrl: https://demo.duendesoftware.com/connect/authorize
          tokenUrl: https://demo.identityserver.io/connect/token
          scopes:
            openid: OpenID Connect identity
            profile: User profile information
            email: User email address

          # Pre-fill Client ID in the authorization dialog
          x-client-id: interactive.public

          # Pre-select default scopes in the checkbox list
          x-default-scopes:
            - openid
            - profile

          # Enforces PKCE: Hides client secret field entirely from the UI
          x-pkce-only: true

          # Custom query parameters sent to authorizationUrl (e.g. proxy launch parameters)
          x-authorize-params:
            launch: xyz123
            prompt: consent

          # Custom parameters sent in POST body to tokenUrl
          x-token-params:
            audience: https://api.example.com

    # Scheme 2: Sandbox / Confidential Client (With Pre-filled Test Secret)
    sandbox-oauth:
      type: oauth2
      description: Sandbox test scheme with credentials pre-populated

      # Scheme-level vendor extensions apply to all flows within this scheme
      x-client-id: interactive.confidential.short
      x-client-secret: secret
      x-default-scopes: openid email
      x-receive-token-in: request-body

      flows:
        authorizationCode:
          authorizationUrl: https://demo.duendesoftware.com/connect/authorize
          tokenUrl: https://demo.identityserver.io/connect/token
          scopes:
            openid: OpenID Connect
            email: Email address
Customizing Parameters via Attributes & Dynamic Events:
When working with Identity Provider proxies (such as Keycloak proxies requiring a launch context token), multi-tenant auth gateways, or token endpoints requiring custom parameters (audience, resource), you can customize parameters statically using attributes or dynamically via DOM lifecycle events:
<!-- Option 1: Static / Semi-Static via HTML Attributes -->
<rapi-doc
  spec-url="/specs/api.yaml"
  additional-authorize-params='{"launch": "xyz123", "prompt": "consent"}'
  additional-token-params='{"audience": "https://api.example.com"}'
></rapi-doc>

<!-- Option 2: Dynamic Programmatic Interception via Events -->
<script>
  const rapidocEl = document.querySelector('rapi-doc');

  // Intercept & inject dynamic query parameters before opening the authorization window
  rapidocEl.addEventListener('before-authorize', (e) => {
    const { securitySchemeId, flowType, authUrl, authParams } = e.detail;
    // authParams is a live URLSearchParams instance
    authParams.set('launch', sessionStorage.getItem('launch_context') || 'default-launch');
    authParams.set('tenant', window.currentTenantId);
    console.log('Opening authorization URL with customized params:', authParams.toString());
  });

  // Intercept & inject dynamic body parameters or headers before calling the token endpoint
  rapidocEl.addEventListener('before-token-request', (e) => {
    const { securitySchemeId, grantType, tokenUrl, params, headers } = e.detail;
    // params is a live URLSearchParams instance for the POST request body
    params.set('resource', 'https://api.mycompany.com');
    // headers is a live Headers instance
    headers.set('X-Device-Fingerprint', getDeviceFingerprint());
  });
</script>Test Authenticated Requests in the Interactive Console
Open index.html in your browser through a web server (e.g., using npx serve, Live Server, or Vite).
Located in RapiDoc's top security bar or beside any protected endpoint with a padlock icon.
Verify that your Client ID and default scopes are pre-selected, then click "Authorize". A popup window will launch.
Log in and authorize access. The popup will automatically close and return you to RapiDoc.
The lock icon will turn active. Every request you make from the built-in console will automatically include Authorization: Bearer <token>!
Common Gotchas & Solutions
Running into issues during setup? Here are the top five configuration issues and how to resolve them quickly.
Redirect URI Mismatch
Your Identity Provider returns an error like "Invalid redirect_uri" or "redirect_uri_mismatch".
oauth-receiver.html, including protocol, port, and trailing path:- Exact port required:
http://localhost:3000/oauth-receiver.html - Case sensitivity:
oauth-receiver.html(all lowercase)
CORS Error on Token Endpoint
The authorization code is acquired, but the browser console displays a CORS network failure when calling tokenUrl.
tokenUrl must respond with standard CORS headers:Access-Control-Allow-Origin: *(or your docs origin)- Ensure your client registration is set to SPA / Public Web in Auth0, Okta, or Azure AD.
Popup Window Blocked
Clicking Authorize does not open the authentication window.
- Always trigger authorization by clicking the "Authorize" button directly.
- Check your browser address bar for popup blocking indicators and click "Always allow popups from this site".
Client Secret Exposure
Committing client secrets into public OpenAPI specs compromises security.
- Add
x-pkce-only: trueunder the flow definition. - This removes the client secret input from the UI and relies on dynamic cryptographic code challenges (RFC 7636).
- Only use
x-client-secretin internal mock or test sandboxes.
Multiple Credentials / Auth Method Mismatch
Your Identity Provider (e.g. OpenIddict, Duende, Keycloak) returns "Multiple client credentials cannot be specified" or rejects token exchange.
- Default (Request Body): RapiDoc defaults to sending client credentials in the POST body (
client_secret_post) to prevent browser CORS preflight failures. - Strict Basic Auth IdPs: If your server strictly requires HTTP Basic (
client_secret_basic), addx-receive-token-in: headerunder your security scheme or select "Authorization Header" in the UI. - Public Clients (PKCE): For browser SPAs without a secret, use
x-pkce-only: true; RapiDoc will transmit onlyclient_idandcode_verifierin the body without an Authorization header.