
OAuth 2.0 Integration & Setup
RapiDoc includes a built-in authentication console that lets developers authenticate against any OAuth 2.0 Identity Provider (IdP), obtain access tokens, and execute authenticated API calls directly from documentation pages.
The Short Version (TL;DR)
Section titled “The Short Version (TL;DR)”Setting up OAuth 2.0 in RapiDoc requires only three straightforward steps:
- Register your client with your Authorization Server (Okta, Auth0, Azure AD, Keycloak, etc.) and register your redirect URI (
https://your-domain.com/oauth-receiver.html). - Create
index.htmlcontaining the<rapi-doc>element pointing to your OpenAPI specification. - Create
oauth-receiver.htmlin the same directory containing the<oauth-receiver>element.
That is all it takes! RapiDoc handles the popup window lifecycle, token exchange, and automatic Authorization: Bearer <token> header injection.
Architecture & Complete Flow
Section titled “Architecture & Complete Flow”When a developer clicks “Authorize” in RapiDoc, the Authorization Code flow executes across two browser windows and your Identity Provider:
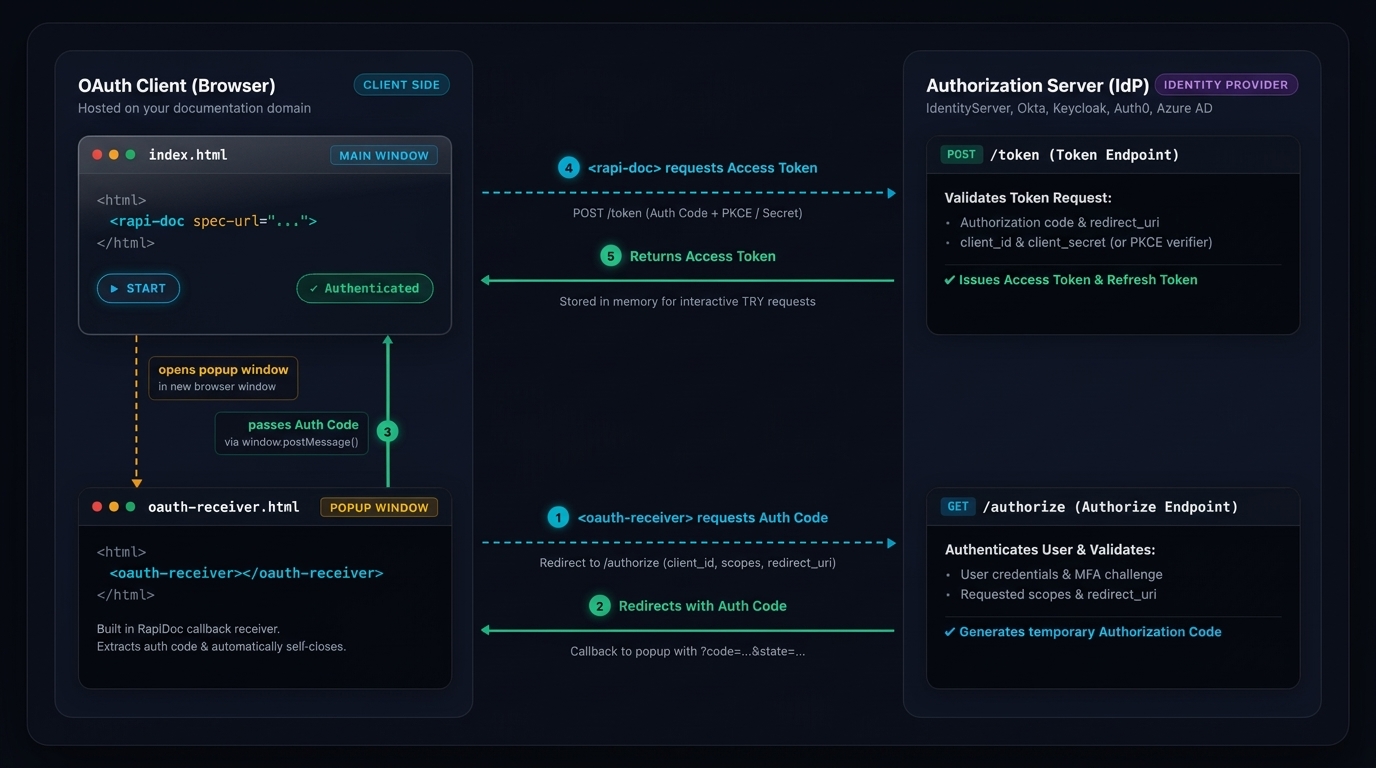
<oauth-receiver> popup relay and PKCE token exchange.Detailed Step-by-Step Breakdown
Section titled “Detailed Step-by-Step Breakdown”- Initiate Authentication: The user clicks “Authorize” on an endpoint or the top security bar.
<rapi-doc>opens a lightweight browser popup window pointing tooauth-receiver.html. - Redirect to IdP:
<oauth-receiver>immediately constructs the authorization URL with yourclient_id, requestedscopes,redirect_uri, and PKCE code challenge, redirecting the user to the IdP’s/authorizescreen. - User Consent & Code Issuance: The user signs in and approves scopes. The IdP redirects the popup back to
oauth-receiver.html?code=<AUTH_CODE>&state=<STATE>. - Local Parameter Relay: The native
<oauth-receiver>custom element extracts the authorization code from the URL, relays it to<rapi-doc>in the parent window viawindow.postMessage(), and automatically closes the popup window. - Token Exchange:
<rapi-doc>sends a POST request to your IdP’s/tokenendpoint containing the authorization code, client ID, and PKCEcode_verifier(or client secret). - Token Persistence: The IdP returns the access token. RapiDoc securely saves the token in memory and automatically attaches
Authorization: Bearer <token>to all subsequent interactive TRY requests.
The Two Required Files
Section titled “The Two Required Files”You only need to serve two static HTML files from your web server:
1. index.html (Primary Documentation)
Section titled “1. index.html (Primary Documentation)”Embed the <rapi-doc> custom element pointing to your OpenAPI spec. If oauth-receiver.html is hosted in the same directory, no additional URL configuration is needed:
<!doctype html><html lang="en"> <head> <meta charset="utf-8" /> <title>API Documentation</title> <script type="module" src="https://unpkg.com/rapidoc/dist/rapidoc-min.js"></script> </head> <body> <rapi-doc spec-url="https://mrin9.github.io/RapiDoc/specs/oauth.yaml"></rapi-doc> </body></html>2. oauth-receiver.html (Authentication Callback)
Section titled “2. oauth-receiver.html (Authentication Callback)”This file must be named oauth-receiver.html and placed alongside index.html. It contains RapiDoc’s companion <oauth-receiver> custom element:
<!doctype html><html lang="en"> <head> <meta charset="utf-8" /> <title>OAuth Receiver</title> <script type="module" src="https://unpkg.com/rapidoc/dist/rapidoc-min.js"></script> </head> <body> <oauth-receiver></oauth-receiver> </body></html>OpenAPI Specification Configuration
Section titled “OpenAPI Specification Configuration”Declare standard OpenAPI 3.0 or 3.1 OAuth 2.0 security schemes under components.securitySchemes.
Standard Security Scheme
Section titled “Standard Security Scheme”openapi: 3.0.3info: title: Protected API Service version: 1.0.0servers: - url: https://api.example.com/v1
paths: /user/profile: get: summary: Retrieve current user profile security: - OAuthScheme: - read:profile - email responses: '200': description: Successful response
components: securitySchemes: OAuthScheme: type: oauth2 description: Enterprise OAuth 2.0 with Authorization Code flow flows: authorizationCode: authorizationUrl: https://auth.example.com/oauth2/v1/authorize tokenUrl: https://auth.example.com/oauth2/v1/token scopes: read:profile: Grants read access to user profile information write:profile: Grants write access to user profile settings email: Grants access to the user's primary email addressVendor Extensions for Seamless Onboarding
Section titled “Vendor Extensions for Seamless Onboarding”RapiDoc provides custom OpenAPI vendor extensions to streamline the developer experience during testing and sandboxing. You can define these extensions at the scheme level or under individual flows:
| Extension | Type | Default | Description |
|---|---|---|---|
x-client-id |
string |
— | Pre-populates the Client ID field in the authorization modal. |
x-client-secret |
string |
— | Pre-populates the Client Secret field (intended for testing/sandbox environments only). |
x-default-scopes |
string or array |
— | Pre-selects default scopes in the permissions checklist. |
x-pkce-only |
boolean |
false |
When set to true, enforces PKCE and hides the client secret field entirely from the UI. |
x-receive-token-in |
string |
request-body |
Specifies whether client credentials are sent in the request-body (client_secret_post) or header (client_secret_basic). |
x-receive-token-in-options |
array |
["request-body", "header"] |
Restricts the client authentication options available in the UI dropdown. |
x-authorize-params |
object or string |
— | Custom query parameters appended to authorizationUrl (e.g. proxy launch tokens, prompt, audience). |
x-token-params |
object or string |
— | Custom parameters sent in POST body to tokenUrl (e.g. proxy parameters, audience, resource). |
Complete Specification Example
Section titled “Complete Specification Example”components: securitySchemes: # 1. Public Client Flow (PKCE Enforced) public-oauth: type: oauth2 description: Public client authorization flow with PKCE flows: authorizationCode: authorizationUrl: https://demo.duendesoftware.com/connect/authorize tokenUrl: https://demo.identityserver.io/connect/token scopes: openid: OpenID Connect identity profile: User profile information email: User email address
# Pre-fill Client ID and default scopes x-client-id: interactive.public x-default-scopes: - openid - profile
# Enforce PKCE: removes Client Secret input from UI x-pkce-only: true
# Custom parameters sent to authorizationUrl (e.g., proxy launch parameter) x-authorize-params: launch: xyz123 prompt: consent
# Custom parameters sent in POST body to tokenUrl x-token-params: audience: https://api.example.com
# 2. Confidential / Sandbox Client Flow confidential-sandbox: type: oauth2 description: Sandbox test scheme with pre-filled test credentials
# Applies to all flows defined within this scheme x-client-id: interactive.confidential.short x-client-secret: demo-secret-key-12345 x-default-scopes: openid email x-receive-token-in: request-body # Default: request-body ('request-body' | 'header')
flows: authorizationCode: authorizationUrl: https://demo.duendesoftware.com/connect/authorize tokenUrl: https://demo.identityserver.io/connect/token scopes: openid: OpenID Connect identity email: User email addressCustom Parameters for IdP Proxies & Multi-Tenant Gateways
Section titled “Custom Parameters for IdP Proxies & Multi-Tenant Gateways”When working with an authorization proxy (such as a Keycloak or SMART-on-FHIR proxy that reads/stores a launch parameter) or an authorization server requiring custom token parameters (such as audience or resource), you can pass parameters through attributes or intercept requests dynamically using custom DOM events:
Method 1: HTML Attributes on <rapi-doc>
Section titled “Method 1: HTML Attributes on <rapi-doc>”Pass parameters directly via attributes on <rapi-doc>. Both attributes support JSON format (recommended), URL query strings, or JavaScript property assignment:
1. JSON String (Recommended in HTML)
Section titled “1. JSON String (Recommended in HTML)”Wrap JSON in single quotes so attribute values can contain double quotes cleanly:
<rapi-doc spec-url="/openapi.json" additional-authorize-params='{"launch": "xyz123", "prompt": "consent"}' additional-token-params='{"audience": "https://api.example.com", "resource": "urn:my:api"}'></rapi-doc>2. URL-Encoded Query String
Section titled “2. URL-Encoded Query String”Standard key-value pairs separated by &:
<rapi-doc spec-url="/openapi.json" additional-authorize-params="launch=xyz123&prompt=consent" additional-token-params="audience=https%3A%2F%2Fapi.example.com"></rapi-doc>3. JavaScript Property Assignment
Section titled “3. JavaScript Property Assignment”Assign standard JavaScript objects directly to the DOM element properties:
const rapidocEl = document.querySelector('rapi-doc');rapidocEl.additionalAuthorizeParams = { launch: 'xyz123', prompt: 'consent' };rapidocEl.additionalTokenParams = { audience: 'https://api.example.com' };Method 2: Programmatic Lifecycle Events
Section titled “Method 2: Programmatic Lifecycle Events”Attach event listeners to <rapi-doc> to inject dynamic runtime tokens or modify request headers before requests are dispatched:
<script>  const rapidocEl = document.querySelector('rapi-doc');
  // 1. Intercept before opening the OAuth authorization popup window  rapidocEl.addEventListener('before-authorize', (e) => {    const { securitySchemeId, flowType, authUrl, authParams } = e.detail;    // authParams is a live URLSearchParams instance    authParams.set('launch', sessionStorage.getItem('launch_token') || 'test-launch');    authParams.set('tenant_id', window.currentTenantId);    console.log('Opening authorization window with params:', authParams.toString());  });
  // 2. Intercept before sending POST request to the token endpoint  rapidocEl.addEventListener('before-token-request', (e) => {    const { securitySchemeId, grantType, tokenUrl, params, headers, request } = e.detail;    // params is a live URLSearchParams instance for the POST body    params.set('resource', 'https://api.mycompany.com');    // headers is a live Headers instance    headers.set('X-Client-Device-ID', 'device-12345');  });</script>